
Quick Answer: How do you match drywall texture in Katy, TX?
Start by identifying your finish under raking light — orange peel, knockdown, or smooth — then replicate it using the correct tool, compound consistency, and air pressure. Katy’s 75–80% year-round humidity changes every step: spray pressure should be kept toward the lower end of the standard range to prevent sag, cure time extends to 48–72 hours, and knockdown timing is read by sheen — not a clock. Getting any one of these wrong produces a visible patch even under fresh paint.
Drywall Texture Matching: What You Need to Know First
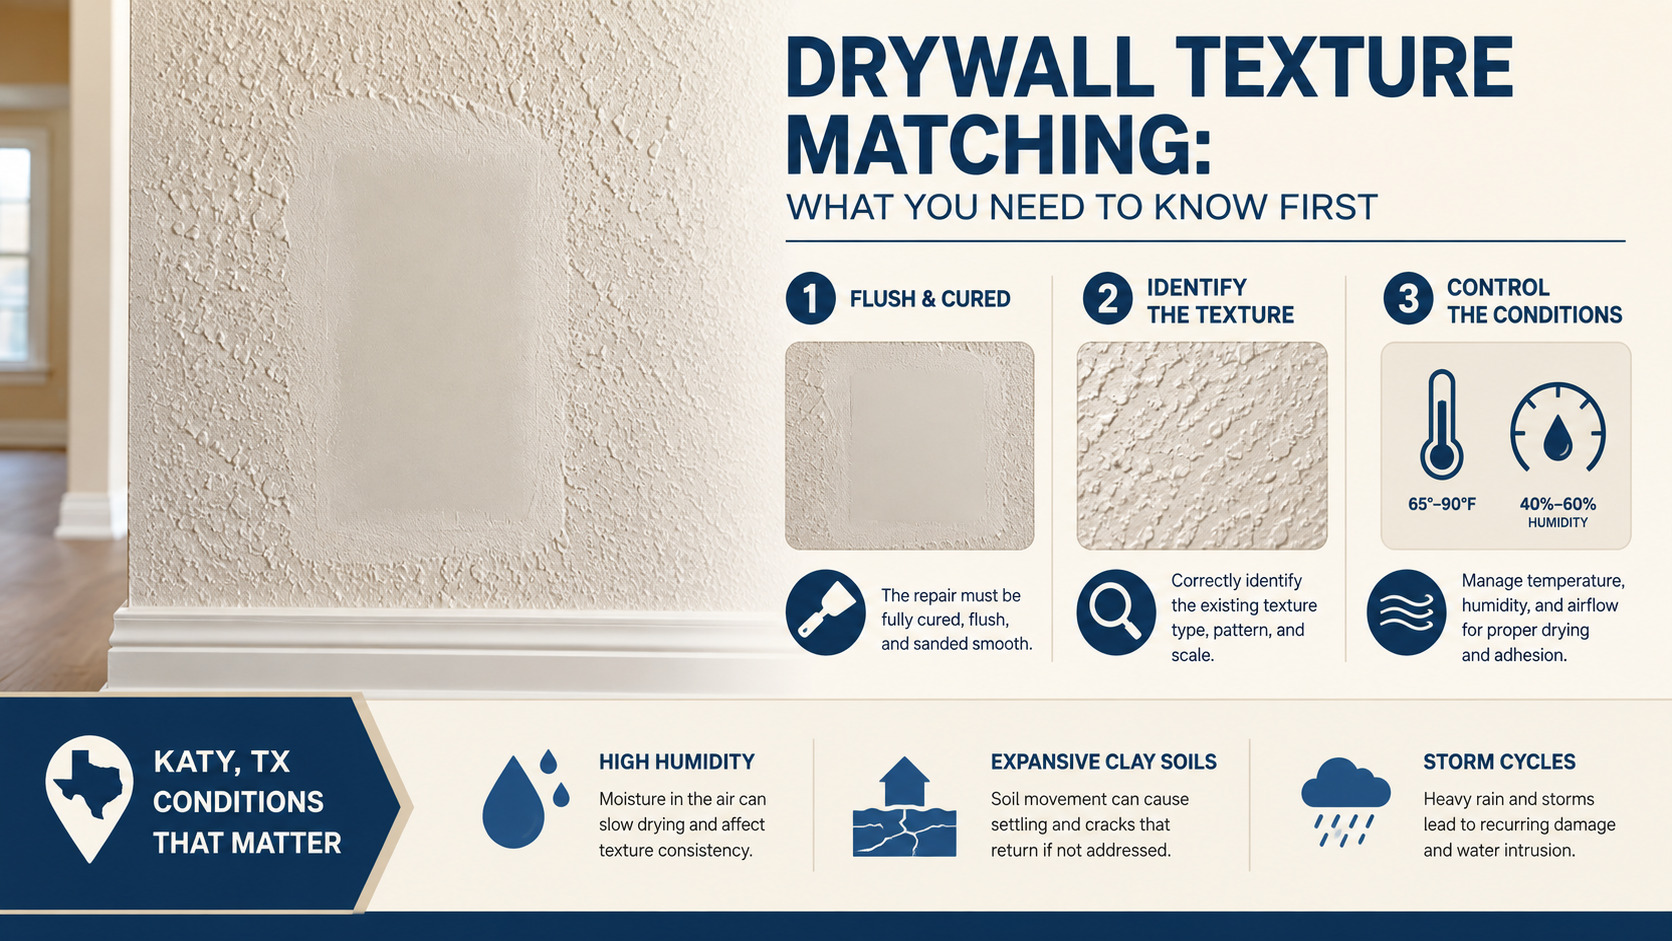
Drywall texture matching is the process of applying a new finish to a repaired wall section so the patch blends invisibly with the surrounding surface. In Katy, TX, it’s one of the most commonly botched home repairs — not because the technique is complicated, but because most guides are written for dry climates. Katy’s humidity, expansive clay soils, and storm-driven damage cycles create a different set of rules than the national standard.
Before any texture is applied, three things must be true: the base repair (the actual hole, crack, or damaged section) must be fully cured and flush-sanded; the existing texture type must be correctly identified; and ambient conditions must be managed. In Katy’s climate, skipping any of these steps produces a repair that’s visible within weeks — if not immediately after painting.
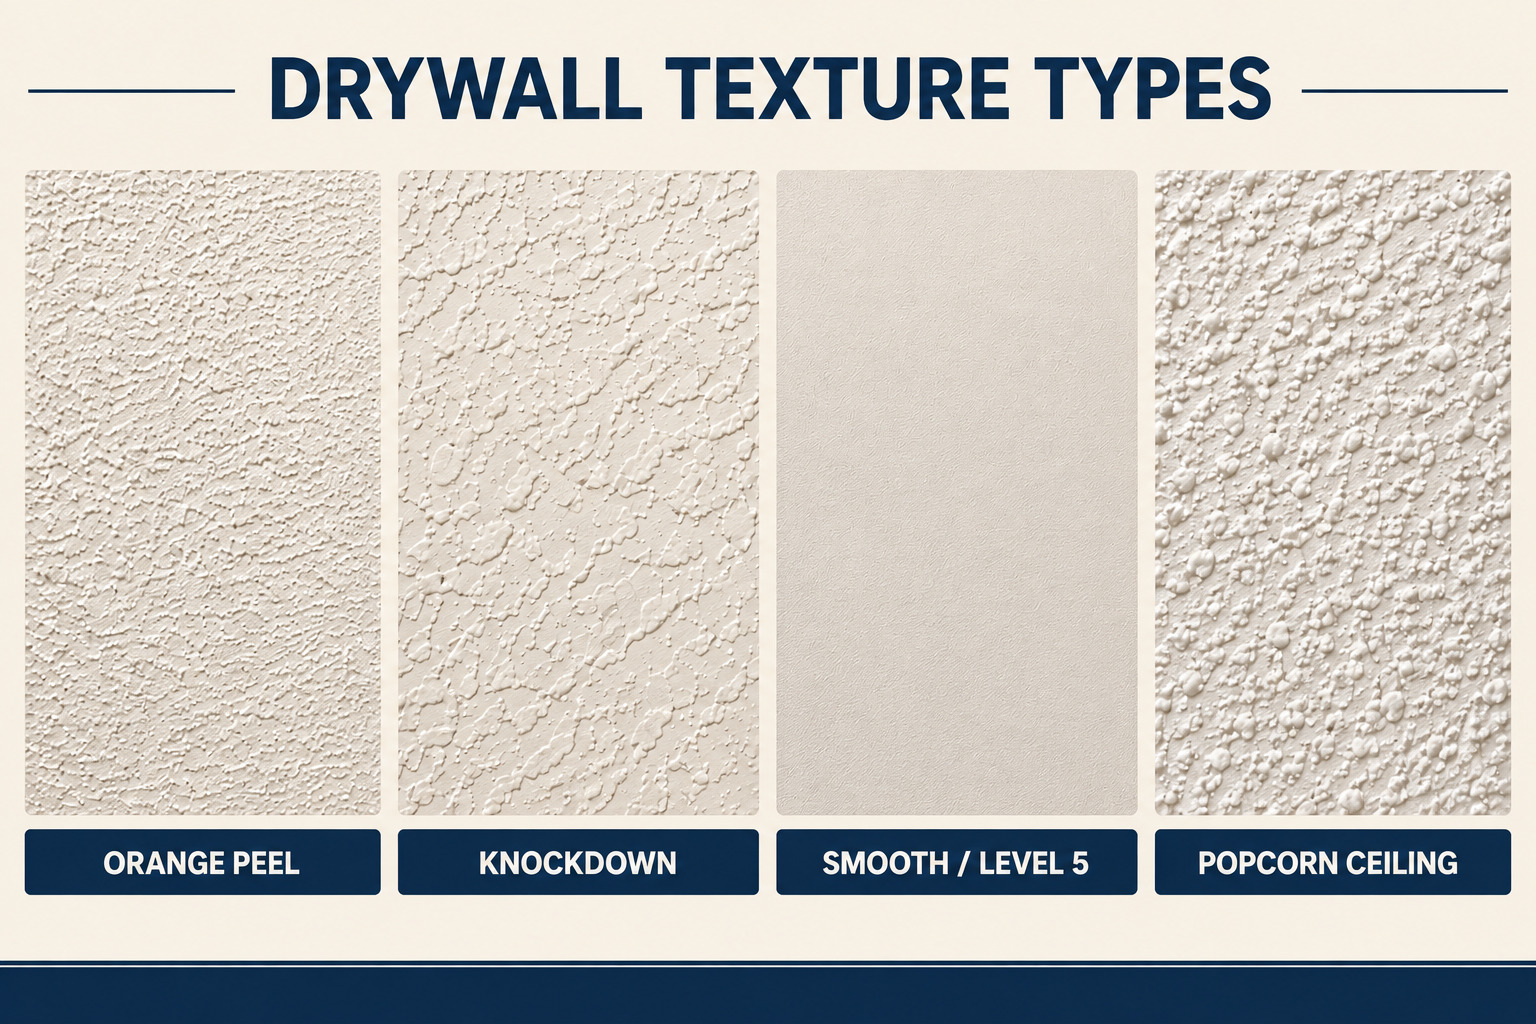
| Texture Type | How It’s Applied | What Makes It Identifiable | Katy Climate Challenge | Matching Difficulty |
|---|---|---|---|---|
| Orange Peel | Spray gun or aerosol can | Small uniform bumps — fine, medium, or coarse | Humidity causes sag at standard PSI | Medium |
| Knockdown | Spray + hand-flatten with knife | Irregular flat islands, mottled | Timing window shifts with AC cycling | High |
| Smooth / Level 5 | Multiple skim coats, hand-applied | No texture — flat surface | Every imperfection visible under light | Very High |
| Popcorn / Acoustic | Spray or brush | Heavy, chunky ceiling bumps | Pre-1980: asbestos risk before repair | High |
| Skip Trowel | Hand-troweled, fully custom | Thick, irregular, larger than knockdown | Each application is unique — no standard | Very High |
| Sand Finish | Roller or brush with silica additive | Fine, uniform grit — like sandpaper | Minimal — most forgiving texture | Low |
Pro Tip: The single most important step in any texture match job is identification — not application. Applying the wrong texture to a patch makes the repair more visible, not less. A 30-second raking light test before anything else eliminates the most common texture mismatch error. See the full identification method in the section below.
Drywall Texture Matching Breakdown by Texture Type
Each texture type in Katy homes requires a different tool, a different compound consistency, and a different application technique. Humidity affects each one differently. Below is a complete breakdown of what each texture is, how it behaves in Katy’s climate, and what correct matching looks like for each.
Orange Peel Texture
Orange peel is the most common wall texture in Katy homes built between 1985 and 2015, and the most forgiving to match. It’s applied by spraying thinned joint compound through a hopper gun or aerosol can, producing small uniform bumps that resemble the surface of a citrus peel. High relative humidity causes orange peel texture to sag and lose definition — and recommends keeping RH under 50% during application and cure. Source: Pro Drywall
For Katy conditions, this means applying toward the lower end of the standard pressure range (25–35 PSI for orange peel) and applying two thin coats rather than one medium coat to prevent sag before the compound sets. Source: Timothy’s Toolbox
Orange peel comes in fine, medium, and coarse bead variations — determined by nozzle size and air pressure at the time of application. A coarse bead applied at high pressure will not match a fine bead applied with a smaller nozzle, even if both are labeled “orange peel.” Always photograph the existing texture under raking light and compare it to the aerosol can’s bead chart before purchasing — the visual difference between fine and coarse is unmistakable under raking light but nearly invisible in normal lighting.
| Bead Size | Visual Description | How It’s Produced | Best Tool | Aerosol Setting |
|---|---|---|---|---|
| Fine | Tight, small bumps — subtle texture | Smaller nozzle + lower air pressure | Aerosol or hopper at lower PSI | Fine |
| Medium | Visible, moderate bumps — most common | Mid-size nozzle + moderate pressure | Aerosol or hopper | Medium |
| Coarse | Larger, more pronounced bumps | Larger nozzle + higher air pressure | Hopper gun preferred | Coarse |
Knockdown Texture
Knockdown is the most visually distinctive texture in Katy’s housing stock and the hardest to match invisibly. It’s a two-step process: spray or roll joint compound onto the wall, let it partially set, then drag a broad drywall knife lightly across the surface to flatten the peaks — leaving an irregular, mottled pattern of flat islands and slight recesses. The pattern is intentionally random, which is what makes matching a small patch within a larger field so technically demanding.
In Katy, the problem is humidity’s effect on the set window. Most national guides say to knock down after 10–15 minutes. In Katy at 80% humidity in July, that window can stretch to 20–25 minutes — then flash-dry suddenly when the AC cycles on. The correct cue is visual, not timed: knock when the compound surface transitions from glossy to matte. This is the single most important Katy-specific adjustment for knockdown work, and it’s absent from nearly every published DIY guide.
Original Insight: Every knockdown applicator leaves a slightly different pattern based on knife pressure, stroke angle, and compound load. When matching a patch, study your existing wall’s pattern under raking light: note the size of the flat islands, the density (how many per square foot), and whether the knockdown is light (peaks barely flattened) or heavy (peaks almost fully pressed flat). Replicating that specific hand means matching the technique of the original applicator — not just the material.
Smooth Wall / Level 5 Finish
Smooth wall finish — classified as Level 5 by the Gypsum Association’s GA-214 specification — requires three to four skim coats of joint compound, each sanded flat before the next is applied. It is the most labor-intensive texture to match invisibly because there is no surface pattern to conceal imperfections. Any ridge, pinhole, or sheen variation becomes visible under glancing light or gloss paint. Source: Gypsum Association
GA-214 specifies that Level 5 finish is required wherever surfaces will receive critical lighting — gloss, semi-gloss, or enamel paints, or walls lit by raking or natural light at a low angle. In Katy homes with open floor plans and large windows, this applies to more wall surfaces than most homeowners realize.
In Katy’s climate, each skim coat requires a full 48-hour cure before sanding and recoating — making a smooth repair a 4–6 day process, minimum. Rushing any coat produces shrinkage lines that show through subsequent layers. A Level 5 primer (high-build, not standard drywall primer) must be applied after the final skim coat, followed by priming the entire wall section — not just the patch — before final paint.
Popcorn Ceiling Texture
Popcorn ceiling texture, also called acoustic texture, is applied by spraying a thick compound mixed with perlite or polystyrene beads. In Katy homes built before 1980, this texture frequently contains asbestos-containing materials. The EPA advises testing before disturbing any pre-1980 ceiling texture, and remediation must precede any repair if asbestos is confirmed.
According to EPA guidelines, any water-damaged area exceeding 10 square feet should also be assessed for mold before closing the wall — particularly relevant in Katy’s humid climate, where mold can colonize behind drywall within 24–48 hours of water intrusion. For post-1980 popcorn ceilings, matching is straightforward if the original spray product is still manufactured. Many older formulations are discontinued, requiring custom blends to match bead density and peak height. Source: EPA
What Makes Texture Matching Harder in Katy, TX
Katy’s environment creates texture matching challenges that don’t exist in most U.S. markets. The four primary factors are expansive clay soils that generate recurring damage, persistent high humidity that alters compound behavior at every stage, post-storm demand spikes that affect scheduling and material supply, and minimum service call fees that change the economics of small jobs.
Clay Soil Foundation Movement
Fort Bend County sits on Vertisol clay soils with 40–75% clay content, per USDA NRCS soil survey data. These soils expand significantly when wet and contract when dry, producing up to 6 inches of vertical ground movement seasonally. That movement stresses the home’s slab, framing, and drywall — cracking seams, corners, and surfaces around doors and windows. Expansive soils cause an estimated $15 billion in annual structural damage nationally, more than earthquakes and floods combined, according to the American Society of Civil Engineers. Sources: Natural Resources Conservation Service U.S. Department of Agriculture, American Society of Civil Engineers
The practical consequence for texture matching: a patch applied over an active soil-movement crack will fail again within 6–18 months — regardless of how well the texture was matched. The right sequence is structural diagnosis first, then cosmetic repair. Repainting the same crack without addressing the root cause is the most common recurring repair mistake in Katy homes.
Humidity and Extended Dry Times
Katy’s average relative humidity is 75–80% year-round for the Houston-Katy corridor. Source: NOAA
This affects texture matching at three critical stages:
- Base repair cure time: Joint compound labeled “dries in 24 hours” takes 48–72 hours to fully cure in Katy. Applying texture over compound that isn’t fully dry produces cracks and adhesion failures in the texture layer itself.
- Spray behavior: At standard air pressure, compound droplets in high humidity stay wet longer, spreading before they set — causing orange peel texture to sag and lose definition. High RH is identified as a cause of sagging and is recommended to keep RH under 50% during application. In practice, this means applying toward the lower end of the standard PSI range and working in thinner coats to allow each pass to set before the next is applied. Source: Pro Drywall
- Knockdown timing: Compound stays workable 10–15 minutes longer than in dry climates, then can flash-dry suddenly when HVAC activates. Using sheen as the set indicator — not a timer — is the only reliable method.
Demand Spikes After Storm Events
Katy receives 50+ inches of rain annually — roughly double the U.S. national average — per NOAA data. After major rain events, demand for drywall and texture repair surges sharply, tightening contractor availability and pushing labor rates up 30–50% in the weeks following a storm. Scheduling repairs outside the June–September storm window typically produces shorter lead times and more competitive quotes.
Minimum Service Call Fees
Most licensed handymen and drywall contractors in Katy charge a minimum service call of $150–$275 per trip to cover mobilization, travel, and the first hour of labor. For small texture patches where a DIY attempt is tempting, this fee changes the calculation: a failed DIY attempt followed by a professional service call typically costs more than booking the professional from the start — plus the tech must now remediate the failed DIY work before matching the texture correctly.
The Raking Light Test: The Step Every Homeowner Gets Wrong
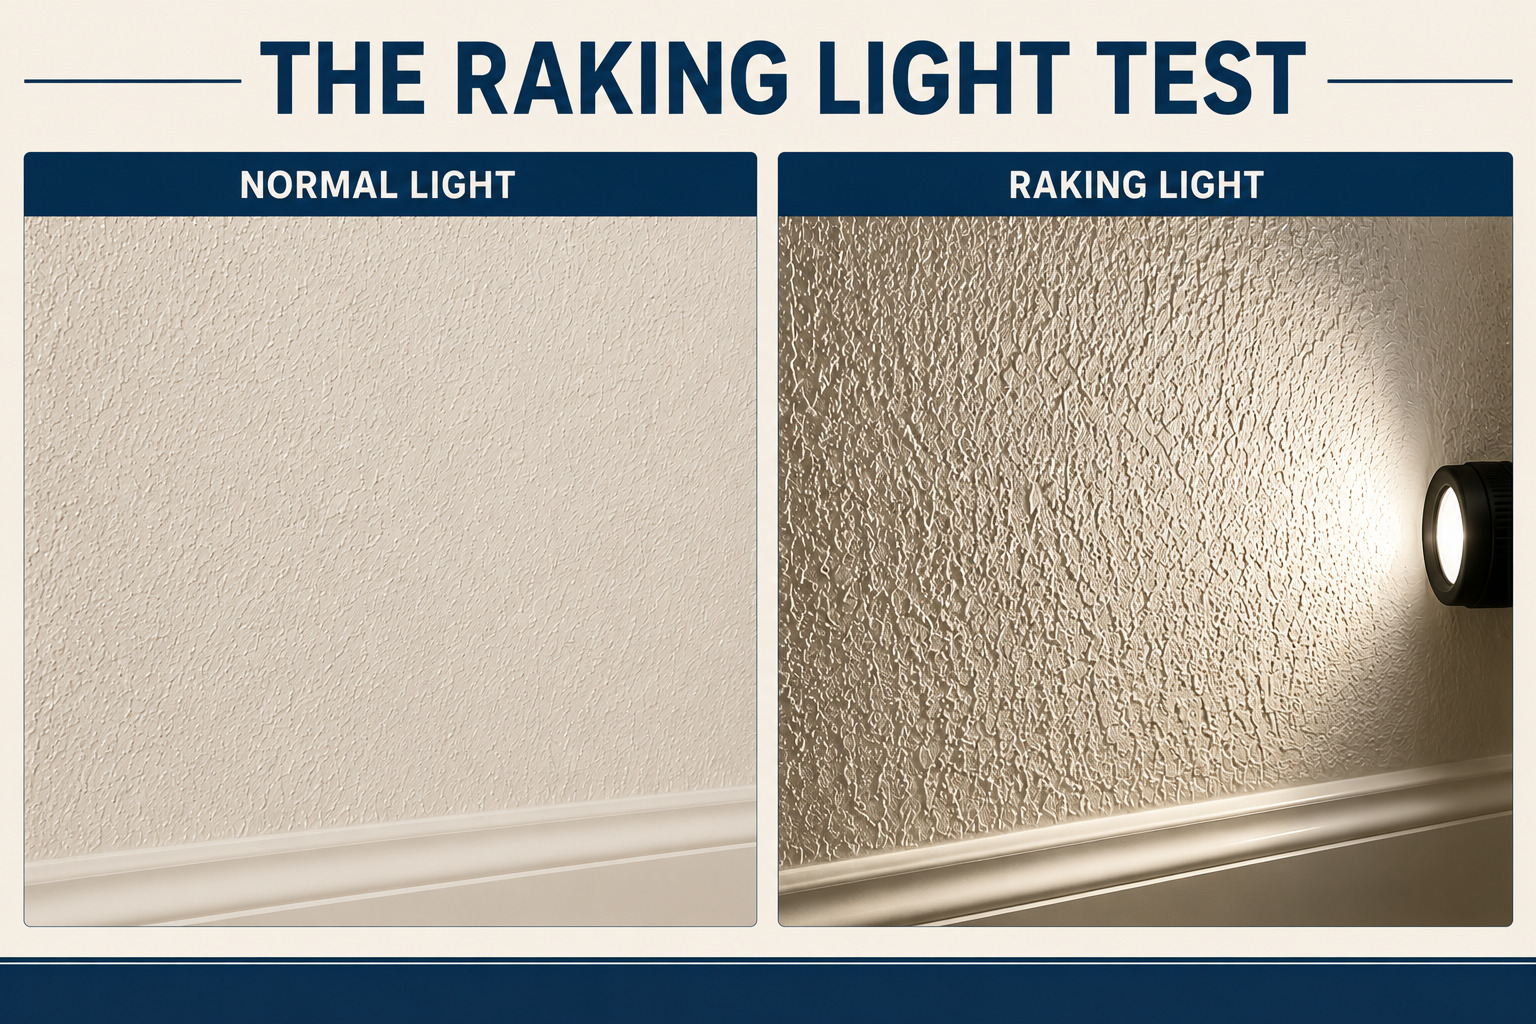
The raking light test is the single most overlooked step in drywall texture matching — and skipping it is the leading cause of wrong-texture applications. Hold a flashlight or phone light 2–4 inches from the wall at a 10–15 degree angle. The near-horizontal light casts shadows across the surface, revealing the texture pattern in clear relief. Without raking light, orange peel and fine knockdown look nearly identical to the naked eye. Under raking light, they are unmistakable.
How to Read the Raking Light Test
- Small, uniform round bumps — fine, medium, or coarse → Orange Peel
- Irregular flat islands with recessed areas between them → Knockdown
- No shadow at all — flat surface → Smooth / Level 5
- Heavy, chunky ceiling texture with pronounced peaks → Popcorn / Acoustic
- Thick, hand-applied irregular patches larger than knockdown islands → Skip Trowel
- Fine, uniform grit — surface feels like sandpaper → Sand Finish
Photograph the wall under raking light before calling any contractor. That single photo gives a technician more useful information than a verbal description and eliminates misquotes caused by incorrect texture identification over the phone. It also gives you a reference point when comparing the completed repair — hold the same light at the same angle to verify the match before paint is applied.
Katy-Specific Issue: Katy homes often have varying textures across rooms. Smooth finishes are standard in kitchens and bathrooms, knockdown in living areas, and orange peel in bedrooms — a pattern consistent with Katy’s housing stock. Never assume the texture in one room matches another. Run the raking light test in the specific room where the repair is needed.
| What the Raking Light Shows | Texture Type | Correct Tool | Compound Consistency | PSI Guidance (Katy Humidity) |
|---|---|---|---|---|
| Small uniform bumps (fine) | Orange Peel — Fine | Aerosol can (fine setting) or hopper | Thinner than peanut butter | Lower end of 35–60 PSI standard range; apply in thin coats to prevent sag |
| Small uniform bumps (coarse) | Orange Peel — Coarse | Hopper gun preferred | Slightly thicker | Lower end of 35–60 PSI standard range; test on cardboard first |
| Irregular flat islands, mottled | Knockdown | Hopper gun + 10″ drywall knife | Thicker — holds peaks before knock | 25–30 PSI standard; knock by sheen not timer |
| No shadow — completely flat | Smooth / Level 5 | 12″ finishing knife + sander | Thin skim — 1/16″ per coat | N/A — hand-applied; 48-hr cure per coat in Katy |
| Heavy chunky ceiling bumps | Popcorn / Acoustic | Spray or brush | Heavy — pre-mixed popcorn compound | Test for asbestos first if pre-1980 |
Step-by-Step: How to Match Drywall Texture in Katy, TX
A correct texture match in Katy follows four stages regardless of texture type: prepare the base repair, identify and test the texture, apply in climate-adjusted conditions, and prime the full wall section before painting. Skipping the last step — priming only the patch instead of the entire wall — is the most common reason a professionally matched repair is still visible after painting.
Stage 1: Prepare the Base Repair
- Complete the underlying patch. The hole, crack, or damaged section must be repaired with joint compound before any texture is applied. Feather compound edges 6–8 inches past the damage perimeter.
- Wait for full cure — not just surface dryness. In Katy’s humidity, compound that looks dry on the surface can still be wet underneath. Rule of thumb: if the compound is still gray anywhere or cool to the touch, it is not ready. Full cure in Katy takes 48–72 hours, not the 24 hours listed on packaging.
- Sand flush. The patched surface must be perfectly level with the surrounding wall. Any ridge or depression is amplified by texture and will show through paint.
- Apply PVA drywall primer to the patch only — before texturing. Unprimed drywall absorbs compound at a different rate than primed surrounding drywall, creating visible hot spots in the texture. This primer coat is not the final wall prime — it is applied only to the bare patch, before texture goes on.
Stage 2: Identify Texture and Test on Cardboard
- Run the raking light test (described in the section above). Photograph the result.
- Set up your spray gun, aerosol, or trowel with the compound consistency appropriate to the texture type.
- Test on cardboard first — always. Spray or apply compound to a piece of cardboard scrap. Let it set, then hold it next to the wall under raking light. Adjust PSI, dilution, or technique until the cardboard matches the wall. This step is non-negotiable and costs five minutes. Skipping it and going straight to the wall costs the entire job if the match is wrong.
Stage 3: Apply Texture with Katy-Specific Adjustments
For orange peel:
- Run hopper gun toward the lower end of the standard orange peel range — 25–35 PSI — to prevent humidity-induced sag. High humidity keeps droplets wet longer; lower pressure reduces spread before the compound sets.
- Apply in two thin passes, 20–30 minutes apart, rather than one medium coat.
- Feather spray density — dense at patch center, tapering to sparse at the patch edge — to avoid a hard texture line.
For knockdown:
- Spray or roll compound onto the patch, slightly heavier than orange peel density.
- Do not use a timer. Watch the compound surface sheen. When it transitions from glossy to matte, the compound is ready to knock down. In Katy summers, this window shifts with every HVAC cycle — watch, don’t time.
- Hold a 10-inch drywall knife at 15–20 degrees to the wall. Skim across peaks with light pressure — you are flattening, not pressing down.
- Work in smaller sections than in dry climates to keep the entire wet area at the same set stage.
For smooth / Level 5:
- Apply first skim coat at 1/16-inch thickness with a 12-inch finishing knife.
- Cure 48 hours. Sand with 120-grit. Remove all dust before the next coat.
- Apply second coat at 90 degrees to the first. Cure 48 hours. Sand with 150-grit.
- Apply a third coat if any pinholes or scratches remain. Cure 48 hours.
- Apply high-build Level 5 primer (not standard drywall primer) over the finished skim area. Standard primer does not seal Level 5 compound evenly and causes sheen variation after paint.
Stage 4: Prime and Paint the Full Wall Section
After texture is fully cured and the patch has been spot-primed with Level 5 primer (for smooth) or standard drywall primer (for spray textures), prime the entire wall section — corner to corner — with interior latex primer. Do not spot-prime and spot-paint. New drywall and compound absorb paint differently than old, painted surfaces. The primer equalizes absorption; skipping it leaves a sheen difference that reveals the patch under any angled light even after two coats of finish paint.
Stat: The median hourly wage for drywall installers in the Houston-Sugar Land metro is $22.80/hour. With overhead, Katy professional texture matching rates run $60–$90/hour. A full smooth-wall repair requiring 4–6 days of cure time across multiple visits accounts for why Level 5 matching is the highest-cost texture job — not material cost, but controlled multi-day labor. Source: U.S. Bureau of Labor Statistics
DIY vs. Professional Texture Matching in Katy, TX
DIY texture matching is viable in a narrow set of conditions: small orange peel patches in low-visibility areas, where you have a dehumidifier running, have tested the spray on cardboard first, and plan to repaint the entire wall — not just the patch. Outside those conditions, the failure rate is high enough that professional work is the lower-risk and often lower-cost option, once a failed DIY attempt and the service call to fix it are factored in.
The 48-Hour Cure Test
Before applying any texture in Katy, run this test: spread a thin layer of joint compound on a piece of cardboard and place it in the room where you’ll be working — same temperature, same humidity, same AC airflow. Check at 24 hours and 48 hours. If it’s gray or cool at 24 hours, you are in high-humidity conditions — plan on 48–72 hours of cure time for every compound layer in your repair. This test takes 90 seconds to set up and prevents the most common Katy texture failure: applying the next step over compound that isn’t ready.
Spot Match vs. Full Wall Re-Texture: Decision Guide
| Situation | Recommended Approach | Why |
|---|---|---|
| Single patch, low-visibility room (closet, laundry) | Spot texture match | Minimal visibility risk; aerosol DIY viable |
| Single patch, high-visibility room (living room, entry) | Professional spot match + full-wall prime before paint | Sheen mismatch is visible; full-wall prime essential |
| Three or more patches across one wall | Full wall re-texture | More economical; produces uniform result |
| Same crack repaired 2+ times | Structural assessment first, then re-texture | Clay soil movement will re-crack the repair without diagnosis |
| Home being listed for sale | Professional match — full wall prime | Visible patches damage buyer confidence and perceived home condition |
| Water-damaged drywall | Mold assessment before any texture work | EPA recommends professional assessment for any water-damaged area over 10 sq. ft. |
When DIY Makes Sense in Katy
- Orange peel patch under 4–6 inches in a closet, laundry room, or utility space
- You have a dehumidifier running in the work area during application and throughout the cure period
- The aerosol can bead setting matches the existing texture (confirmed on cardboard under raking light, not assumed)
- You are repainting the entire wall — not spot-painting — which eliminates the sheen mismatch problem
- You can allow 48–72 hours between each stage without the room being used
When to Hire a Professional
- Knockdown texture — timing is climate-sensitive and the sheen-watch technique takes practice to execute correctly
- Smooth / Level 5 finish — requires multiple skim coats, specific primer, and a multi-day schedule
- Skip trowel — fully hand-applied; replicating the original applicator’s pattern is a skilled trade task
- Any patch larger than 12 inches in diameter
- Ceiling texture of any type — overhead application is the most technically demanding condition
- High-visibility room — living room, entry hall, master bedroom, open-plan living area
- The crack has recurred — structural diagnosis before cosmetic repair is the correct sequence
- Water damage is present — mold risk must be cleared before any wall is closed
| Factor | DIY | Professional |
|---|---|---|
| Orange peel — small, low-visibility | Viable with aerosol + dehumidifier | Guaranteed invisible match |
| Knockdown — any size | High failure rate; timing window is climate-variable | Strongly recommended |
| Smooth / Level 5 | Not recommended without plastering background | Required for invisible result |
| Humidity management | Inconsistent without a dehumidifier + thermometer monitoring | Pro brings controlled equipment and monitors conditions |
| Full-wall prime before paint | Often skipped — leading cause of visible DIY patches after paint | Included in professional scope |
| Cost if successful first attempt | $15–$100 materials | $175–$575 depending on texture and size |
| Cost if DIY fails and pro is needed | $200–$650 (materials + remediation + service call) | $175–$575 — same job, no redo cost |
How to Hire a Drywall Texture Matching Pro in Katy, TX
Texture matching is a technical skill, not a general handyman task. The right question to ask before booking anyone is not “do you do drywall?” but “how do you adjust for Katy’s humidity?” A qualified local technician will immediately reference lower spray pressure, extended cure times, and using surface sheen rather than a timer for knockdown. A vague or generic answer is a disqualifying red flag.
What to Ask Before You Book
- “How do you adjust your texture technique for Katy’s humidity?” This is the single most diagnostic question. Right answer: mentions PSI reduction, extended cure times, and sheen-based knockdown timing. Wrong answer: “I just do it the normal way.”
- “Will you prime the entire wall section before paint, or just the patch?” Full-wall prime is the correct answer. Spot-prime only means the sheen mismatch will show through the finish coat.
- “Is this job flat-rate or time-and-materials?” Flat-rate eliminates cost uncertainty from Katy’s unpredictable multi-day cure schedules.
- “Do you charge for a return visit if a second texture pass is needed?” On knockdown and smooth finish, a second visit is sometimes necessary — know this in advance.
- “Can you show me raking-light photos of prior texture match work in Katy?” Not just finished painted walls — raking-light photos before paint that show the texture itself.
Red Flags to Avoid
- Quote given without seeing the damage in person or via raking-light photos
- No mention of primer in the process description
- Promising to complete knockdown or smooth finish same-day — both require multi-day cure stages in Katy
- Unable to provide a TDLR license number — verify at tdlr.texas.gov. Texas had over 1 million active licensed contractors as of TDLR’s FY2025 report; verification takes 60 seconds
- No general liability insurance certificate available (minimum $300,000 for residential work)
- Cash-only with no written invoice or job scope
- No references for the specific texture type you need — ask for those references, not general handyman references
Frequently Asked Questions
How do I know what texture my walls have in Katy, TX?
Hold a flashlight 2–4 inches from the wall at a 10–15 degree angle. The raking light reveals the texture pattern in clear shadow: small uniform bumps are orange peel; irregular flat islands are knockdown; no pattern at all is smooth. Take a photo under this light before calling any contractor — it’s the most useful information you can provide.
What is the hardest drywall texture to match?
Smooth wall (Level 5 finish) is the hardest to match invisibly — there is no texture pattern to hide imperfections, and any sheen variation shows through gloss or semi-gloss paint. Knockdown is a close second because the timing is climate-sensitive and every original application is unique to the applicator’s hand and pressure. Both require professional work for invisible results in high-visibility areas.
Why does drywall texture crack so often in Katy, TX?
Fort Bend County’s expansive Vertisol clay soils shift seasonally — expanding when wet, contracting when dry — producing up to 6 inches of vertical ground movement per USDA NRCS data. That movement transfers into the home’s slab and framing, cracking drywall at seams, corners, and around door and window frames. Repairing the texture without diagnosing the soil-movement cause produces a patch that cracks again within 6–18 months.
How long does drywall texture take to dry in Katy’s climate?
Joint compound takes 48–72 hours to fully cure in Katy’s 75–80% average humidity — compared to the 24 hours listed on most packaging. Running a dehumidifier in the work area can reduce this to 36–48 hours. Never apply texture, primer, or paint over compound that is still gray or cool to the touch, regardless of what the label says.
Can I use an aerosol spray can to match orange peel texture?
Yes — for patches under 6 inches in low-visibility areas. Aerosol orange peel cans come in fine, medium, and coarse bead settings ($10–$15 at Home Depot or Lowe’s). Test on cardboard under raking light before applying to the wall. For patches over 6 inches, a hopper gun gives more consistent pressure and humidity performance than an aerosol can.
How do I match knockdown texture in Katy’s humidity?
Spray or roll compound onto the wall and watch the surface sheen — not the clock. Knock down with a broad drywall knife when the surface transitions from glossy to matte. In Katy, that window can range from 8 to 25 minutes depending on temperature and AC cycling — standard timer-based instructions from dry-climate guides do not apply. Work in smaller sections so the entire wet surface stays at the same set stage.
Why is my texture still visible after painting?
The most common cause is spot-painting the patch instead of priming and painting the entire wall section. New compound and drywall absorb paint at a different rate than old, painted surfaces, creating a sheen difference visible under any angled light. The fix is to apply interior latex primer across the full wall (corner to corner) before the finish coat — not just over the patch.
Do I need to prime before applying texture?
Yes — a PVA drywall primer applied to the bare patch before texturing is non-negotiable. Unprimed drywall absorbs compound unevenly, creating hot spots where texture won’t adhere correctly. This is the patch primer. A second, separate prime coat over the full wall section is needed after texture and before final paint.
Is it safe to repair popcorn ceiling texture in an older Katy home?
Not without testing first. Popcorn ceiling texture applied before 1980 frequently contains asbestos. DIY asbestos test kits cost $30–$50 (mail-in lab). A professional inspector tests for $100–$300. Do not sand, scrape, or spray over any untested pre-1980 ceiling texture — disturbing it releases fibers. If asbestos is confirmed, abatement must precede any repair or removal.
Can I match a texture that was applied by a previous owner?
Yes, as long as the texture type and bead size can be identified. Use the raking light test and photograph the result. Bring the photo to a paint or drywall supply store to identify the correct aerosol setting or hopper configuration. For unusual or custom textures — skip trowel, rosebud, slap brush — ask specifically for technicians with custom finish experience and request photos of similar prior work.
How do I match smooth wall finish without it showing?
Smooth wall matching requires three to four thin skim coats, each sanded flat before the next is applied, followed by a high-build Level 5 primer and priming of the entire wall section before paint. Each coat needs 48 hours of cure time in Katy’s humidity. The most common failure point is spot-priming the patch and painting over it — Level 5 primer must cover the full skim-coated area, and the entire wall section must be primed with interior latex before the finish coat.
Does Handyman Katy do texture matching for all texture types?
Yes. Handyman Katy technicians match orange peel (all bead sizes), knockdown, smooth / Level 5, skip trowel, sand finish, and popcorn ceiling texture (post-1980 or after confirmed asbestos clearance). All texture work is quoted flat-rate with a written scope before any work begins.
What is the difference between orange peel and knockdown texture?
Orange peel is a spray-only finish — compound is sprayed and left to set without any additional manipulation, producing small uniform bumps. Knockdown is a two-step process — compound is sprayed or rolled on, then partially flattened with a broad knife before it fully sets, producing irregular flat islands. Orange peel is faster to apply and more forgiving in humid conditions. Knockdown is more labor-intensive and more timing-sensitive in Katy’s climate.
Get a Flat-Rate Drywall Repair Quote in Katy, TX
Handyman Katy handles the full drywall repair — and texture matching is always included. Every patch is finished to blend seamlessly with your existing surface, whether that’s orange peel, knockdown, smooth, or something in between. We serve Katy, Cinco Ranch, Cane Island, Elyson, Firethorne, and surrounding Fort Bend County communities. For expert drywall texture matching that’s part of a complete repair — not a separate line item — call us today.
Upfront Flat-Rate Pricing · Zero-Pressure Options · Background-Checked Pros · 5.0 Stars on Google
Call +1 346-857-0529
About Handyman Katy
Katy’s trusted specialist in residential drywall repair, seamless texture blending, and reliable home maintenance. Founded with a commitment to upfront flat-rate pricing and dependable craftsmanship.
-
Flat $275 Service Call — Covers the first hour of labor and basic materials, with zero hidden fees.
-
Zero-Pressure Repair Options — Transparent recommendations tailored to your home’s needs.
-
Background-Checked & Certified Technicians — Courteous, professional, and respectful of your home.
-
Local Climate Experts — Specialized in repairing structural shifts and humidity damage unique to Katy and Harris County.
-
5-Star Service — Trusted by homeowners across the Greater Katy area.
-
Fully Licensed & Insured · Texas
Sources & Citations
- USDA Natural Resources Conservation Service. (2024). Soil survey, Fort Bend County, TX. U.S. Department of Agriculture. https://www.nrcs.usda.gov/resources/data-and-reports/soil-survey
- NOAA National Centers for Environmental Information. (2024). Climate normals — Houston-Katy corridor. National Oceanic and Atmospheric Administration. https://www.noaa.gov/
- American Society of Civil Engineers. (2021). Expansive soils annual damage estimate. ASCE. https://www.asce.org/publications-and-news/civil-engineering-source/civil-engineering-magazine/issues/magazine-issue/article/2021/06/expansive-soils-a-national-threat
- U.S. Bureau of Labor Statistics. (2025, May). Occupational employment and wages — drywall and ceiling tile installers, Houston-Sugar Land MSA. U.S. Department of Labor. https://www.bls.gov/oes/current/oes472081.htm
- Gypsum Association. (2020). GA-214: Recommended levels of gypsum board finish. Gypsum Association. https://www.gypsum.org/
- U.S. Environmental Protection Agency. (2024). Mold remediation in schools and commercial buildings — Chapter. EPA. https://www.epa.gov/mold/mold-remediation-schools-and-commercial-buildings-guide-chapter-1
- Texas Department of Licensing and Regulation. (2025). Contractor license search — FY2025. State of Texas. https://www.tdlr.texas.gov/LicenseSearch/licfile.asp
- Angi. (2025). How much does drywall repair cost? 2025–2026 guide. Angi Inc. https://www.angi.com/articles/how-much-does-drywall-repair-cost.htm
- Gypsum Association. (2011). Drying joint compound: Recommended conditions. Gypsum Association. https://www.gypsum.org/wp-content/uploads/2011/11/WC0211DryingJointCompound.pdf
- Pro Drywall Blog. (2023). How temperature and humidity affect drywall cracking and texture. pdahm.com. https://www.pdahm.com/blog/how-temperature-and-humidity-affect-drywall-cracking-and-texture.php
- Timothy’s Toolbox. (2024). Professional tips on texturing drywall with a hopper gun. Timothy’s Toolbox. https://timothystoolbox.com/blogs/blog/professional-tips-on-texturing-drywall-with-a-hopper-gun