
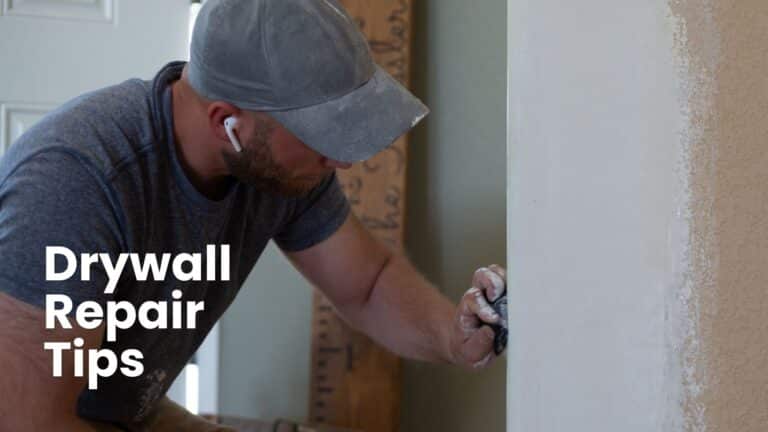
Quick Answer: What Are the Most Important Drywall Repair Tips for Katy Homes?
The most critical drywall repair tips for Katy homeowners are: use setting-type compound (not pre-mixed) for structural repairs, always prime before painting, and address moisture intrusion before patching — humidity in the Katy area averages 75–80% year-round, which prevents proper compound adhesion if the source isn’t fixed first.
Most Katy homeowners discover drywall damage the same way: a nail pop appears before a dinner party, a door handle punches through the wall, or water stains bloom after a storm rolls through Harris County. What looks like a cosmetic nuisance is often a symptom of something fixable, and in most cases, fixable yourself.
This guide covers every common drywall repair scenario Katy homes face, with step-by-step instructions, material costs, a calibrated decision table for DIY vs. professional repair, and the one mistake that causes most failed drywall patches in high-humidity climates like ours.
Why Drywall Damage Is More Common in Katy Than You Might Think
Katy-Specific Context:Katy’s climate — high humidity, expansive clay soils, and seasonal flooding — makes drywall damage more frequent and more complex than in drier regions. The most common local causes are foundation movement, humidity-driven tape separation, and storm-related water intrusion.
Standard drywall (gypsum board) is hygroscopic. It absorbs and releases moisture from the surrounding air. In a region where relative humidity averages 75–80% in summer months, drywall that isn’t properly sealed is in a constant state of mild expansion and contraction.
Add Katy’s notorious clay soils, which expand when wet and contract when dry, and you have a foundation that shifts seasonally. That movement telegraphs through the framing and into the drywall as cracks, nail pops, and tape separation at seams.
- Seasonal cracking — Hairline cracks at corners and seams caused by foundation flex
- Nail pops — Fasteners pushed forward by framing lumber shrinkage after initial construction
- Tape bubbling — Paper tape releasing from seams due to humidity cycling
- Water damage — From roof leaks, window condensation, or flooding events (Harris County is one of the most flood-prone counties in the U.S.)
- Impact holes — Door handles, furniture corners, doorknob strikes
~75–80%Average relative humidity in the Katy/Houston metro during summer months, per NOAA Climate Data. This is significantly above the 30–50% RH range in which drywall compound and primer cure optimally. (Source: National Oceanic and Atmosphere Administration)
Tools and Materials You Need Before You Start
Minimum Tool Kit for Drywall Repair:A 6-inch and 10-inch drywall knife, setting-type joint compound (for structural repairs) or lightweight pre-mixed compound (for cosmetic repairs), primer, mesh or paper tape for seam repairs, and a sanding block with 120-grit and 220-grit paper. Total cost: $35–$65 for a first-time setup.
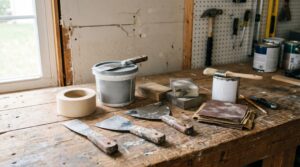
The single most common tool mistake: buying only pre-mixed compound (the green or blue tub). Pre-mixed compound is ideal for final coats and skim work, but it shrinks as it dries, takes 24 hours per coat, and is too soft for structural repairs. Setting-type compound (sold in powder form, mixed with water) is chemically hardened, not air-dried, and can accept a second coat in 90 minutes.
| Item Category | Specific Product/Tool | Purpose |
| Required Tools | 6-inch & 10-inch flexible drywall knives | Spreading and feathering wide patches |
| Sanding block (120-grit & 220-grit) | Shaping and final smoothing | |
| Essential Materials | Setting-type joint compound (Durabond/Easy Sand 45) | Structural base coats (chemically hardens) |
| Lightweight pre-mixed compound (USG All Purpose) | Cosmetic final skim coats | |
| Mesh tape (holes) & Paper tape (seams) | Providing structural reinforcement | |
| PVA-based drywall primer | Preventing paint flashing and peeling |
$35–$65
Average cost to stock basic drywall repair supplies for a first-time setup (compound, tape, knives, sandpaper, primer). Compare this to the $232–$243 average professional cost per drywall repair patch in the Houston metro — labor at $0.90–$2.25 per square foot per Angi’s Houston-specific contractor data. (Sources: Angi, Homeyou)
How to Fix Nail Pops in Drywall (Step-by-Step)
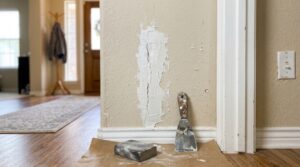
How to Fix a Nail Pop:Drive the popped nail or screw back in, add a new drywall screw 2 inches above and below it to secure the drywall to the stud, then fill the dimples with two thin coats of joint compound. Sand flush and prime before painting. Do not simply hammer the nail back in, or it will pop again.
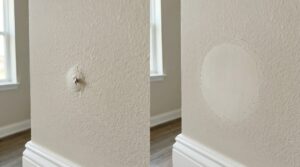
Nail pops are the most common drywall complaint in newer Katy homes. Builders use green lumber that continues to dry and shrink after construction; as the stud behind the drywall shrinks, it pulls away from the fastener and pushes the nail head forward through the surface.
- Do not just hammer it back in. A nail without mechanical grip will re-pop within 6–18 months.
- Drive the original nail slightly deeper — enough to dimple the surface without breaking the paper face.
- Install two drywall screws (1-5/8-inch coarse thread) 2 inches above and below the popped nail into the same stud.
- Apply a thin first coat of setting compound over each dimple. Let cure per package time (45–90 minutes for setting type).
- Apply a second feathered coat with a 6-inch knife, extending 3–4 inches wider than the first coat.
- Sand with 120-grit, then 220-grit. The surface should be indistinguishable from the surrounding wall when raked with a flashlight at an angle.
- Prime before painting. Skipping primer creates a “flashing” effect — the patch absorbs paint differently from the surrounding wall and will be visible at any angle.
How to Repair Small Holes (Up to 4 Inches)
How to Repair Small Drywall Holes:For holes up to 4 inches, use a self-adhesive aluminum patch plate or a California patch (drywall-backed paper tab method). Apply three coats of joint compound, feathering each coat 2–3 inches wider than the last. Sand, prime, and paint. Repair time: 24–48 hours including drying.
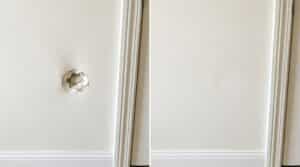
Small holes, from doorknobs, furniture, anchors that pulled through, are the most forgiving drywall repair for first-timers. The technique depends on hole size.
Holes Under 1 Inch
Fill directly with spackle or setting compound using a putty knife. One coat is usually sufficient. Sand flush when dry. No backing required.
Holes 1–4 Inches
- Clean the hole edges — remove any torn paper or loose gypsum.
- Apply a self-adhesive metal mesh patch (available at any hardware store for $3–$8) centered over the hole.
- Apply the first coat of setting compound over the mesh, pressing firmly to work compound into the mesh openings. Keep it thin — the mesh does the structural work.
- Let cure, then apply a second coat with a 6-inch knife, feathering 3 inches beyond the patch edge.
- Apply a third finish coat with a 10-inch knife, feathering 5–6 inches beyond the patch edge.
- Sand with 120-grit, then 220-grit — prime and paint.
$3–$8Cost of a self-adhesive aluminum drywall patch plate — the fastest legitimate solution for 1–4 inch holes. Mesh-backed plates outperform compound-only fills because they provide structural backing without requiring a drywall backer board.
How to Repair Large Holes (4 Inches and Larger)
How to Repair Large Drywall Holes:Holes over 4 inches require a backing structure, either a wood cleat screwed behind the existing drywall or a California patch. Cut the hole into a clean rectangle, fit a new piece of drywall, tape all seams with paper tape and setting compound, then apply two finish coats. This is a 2–3 day process including drying time.
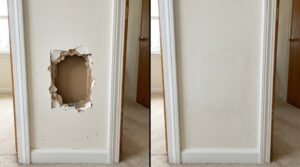
Large holes expose the core limitation of mesh patches: without rigid backing, mesh can flex and crack under finish coats. For holes above 4 inches, you need either a wood cleat method or a California patch.
Wood Cleat Method (Recommended for Beginners)
- Cut the hole into a clean rectangle using a drywall saw. Straight edges are easier to match and tape.
- Cut two wood cleats (1×3 or 1×4 pine) slightly longer than the hole’s height.
- Insert the cleats into the hole and position them behind the drywall on the left and right sides, with half the cleat width exposed as a nailing surface.
- Screw the cleats to the existing drywall through the front face using 1-5/8-inch drywall screws.
- Cut a patch piece of ½-inch drywall to fit the rectangle exactly.
- Screw the patch to the cleats.
- Tape all four seams with paper tape embedded in setting compound.
- Apply two finish coats, feathering 6–8 inches beyond all seams.
- Sand, prime, and paint.
Repairing Cracks in Drywall — The Right Way for Katy Homes
How to Repair Drywall Cracks:For hairline cracks, widen the crack slightly with a utility knife, fill with setting compound, embed paper tape, and apply two finish coats. For recurring cracks at corners or seams, common in Katy due to foundation movement, use fiberglass mesh tape instead of paper tape for added flexibility.
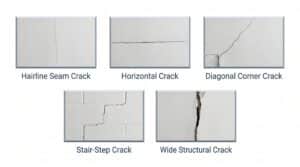
Not all cracks are the same. Hairline cracks at seams are cosmetic. Diagonal cracks running from window and door corners, especially if wider than 1/8 inch, can indicate active foundation movement and warrant evaluation before patching.
Types of Cracks and What They Mean
| Crack Type | Likely Cause | DIY or Professional? |
|---|---|---|
| Hairline crack along seam | Tape separation, normal settling | DIY |
| Horizontal crack mid-wall | Framing movement or impact | DIY |
| Diagonal crack from window/door corner | Foundation flex (common in Katy) | Monitor first; professional if recurring |
| Stair-step crack along seams | Active foundation movement | Foundation inspection before patching |
| Wide crack (>1/4 inch) anywhere | Structural issue | Professional evaluation required |
Step-by-Step Crack Repair
- Widen the crack slightly with a utility knife in a V-shape. This sounds counterintuitive, but a widened crack holds compound better than a hairline gap.
- Blow out any dust and dampen the crack lightly.
- Fill with setting compound, pressing firmly into the crack. Wipe flush with a 6-inch knife.
- Embed paper tape over the crack immediately while the compound is wet. Smooth with the knife.
- Apply a second coat 6–8 inches wide once the first has cured.
- Apply a finish coat 10–12 inches wide. Sand, prime, and paint.
60%of new homes built on expansive clay soils will experience minor structural damage, and 10% will experience significant damage, according to ASCE and USGS estimates cited in the Texas Department of Licensing and Regulation’s official technical bulletin on residential foundations. The Greater Houston area, including Katy, sits on Vertisols: clay-rich soils with 40–75% clay content that shrink when dry and swell when wet, forming cracks more than three feet deep in dry conditions. (Source: Texas Department of Licensing and Regulation)
Water-Damaged Drywall: When to Patch vs. Replace
Should You Patch or Replace Water-Damaged Drywall?Patch if the drywall is structurally sound after drying, meaning it doesn’t feel soft, crumble, or smell musty after 48 hours of dry conditions. Replace if the drywall is soft, crumbling, has visible mold growth, or was submerged during flooding. Do not paint or patch over mold — it will grow through finish coats.
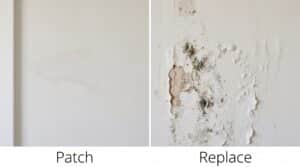
Water-damaged drywall is the most consequential repair decision a Katy homeowner faces. Given Harris County’s history with flooding and the Houston area’s aging infrastructure, moisture intrusion is common, and the decision to patch vs. replace has real health and structural implications.
The 48-Hour Dry Test
After stopping the moisture source (fix the leak or allow flood water to fully recede), allow 48 hours with fans and dehumidifiers running. Then press firmly on the suspect area:
- Firm, no flex: Gypsum core intact. Light surface staining only — patch and prime with stain-blocking primer (Zinsser BIN or Kilz Original).
- Soft or spongy: Gypsum core has broken down. Replace the section.
- Any visible mold (black, green, or fuzzy growth): Replace and treat the framing behind it. Do not sand moldy drywall — it aerosolizes spores.
10 sq ftThe EPA’s threshold above which professional mold remediation is recommended rather than DIY treatment. In Harris County flood events, affected drywall areas routinely exceed this threshold — making professional assessment essential after any significant water event. (Source: Environmental Protection Agency)
The #1 Reason Drywall Repairs Fail in Katy: Skipping Primer
Why Primer Is Non-Negotiable After Drywall Repair:Bare joint compound is extremely porous. Without primer, the first coat of paint soaks in unevenly, leaving a visible “flashing” effect — a dull patch surrounded by sheen — that no additional paint coats will fully hide. In Katy’s humidity, unprimed compound also re-absorbs moisture from latex paint, causing surface softening and peeling.
This is the single most common failure point in DIY drywall repairs, and it’s entirely avoidable. The mistake is understandable: after sanding a patch smooth and confirming it’s flush, the wall looks ready to paint. It isn’t.
Joint compound, whether setting-type or pre-mixed, is essentially a porous plaster. Apply latex paint directly to it, and you get two problems:
- Flashing: The compound absorbs the paint’s binder faster than the surrounding wall, leaving a flat patch in a wall with sheen — visible at any raking light angle.
- Peeling: In humid environments, moisture from the latex paint softens the unprimed compound surface layer, which then de-bonds from the paint film as it dries.
The solution: one coat of PVA drywall primer (Sherwin-Williams ProMar Drywall Primer, Zinsser Gardz, or equivalent) applied to all repaired areas before painting. Let it dry fully (typically 1–2 hours), then apply your finish paint coat normally.
DIY vs. Professional Drywall Repair: Decision Table
When to DIY vs. Call a Professional:DIY is appropriate for holes up to 6 inches, nail pops, hairline cracks, and minor water stains on structurally sound drywall. Call a professional for large hole patches requiring texture matching, repairs near electrical panels, water damage with suspected mold, or any crack pattern suggesting foundation movement.
| Repair Scenario | DIY? | Notes |
|---|---|---|
| Nail pops (1–3 spots) | Yes | Most common and most forgiving DIY repair |
| Small hole (under 4 inches) | Yes | Mesh patch + 3 coats; easy for beginners |
| Medium hole (4–6 inches) | Yes, with research | Requires wood cleat or California patch method |
| Large hole (over 6 inches) | DIY if experienced | Texture matching is the hardest part |
| Hairline seam cracks | Yes | V-groove, tape, and two finish coats |
| Diagonal cracks from window/door corners | Monitor first | May indicate foundation movement; patch may re-crack |
| Water damage — stain only, structurally sound | Yes | Stain-blocking primer essential |
| Water damage — soft or crumbling drywall | Partially | Cut out and replace; professional for large sections |
| Visible mold growth | No | EPA recommends professional remediation over 10 sq ft |
| Texture matching (orange peel, knockdown) | Difficult | Requires spray equipment and practice; pro often worth it |
| Any repair near electrical wiring | No | Always shut off the breaker; professionals for anything complex |
$150–$400Typical professional drywall repair cost in the Houston/Katy metro for a small-to-medium patch (labor only), based on local contractor estimates. Texture matching adds $50–$150 to that total depending on pattern complexity.
Texture Matching in Katy Homes: The Hardest Part of Drywall Repair
How to Match Drywall Texture:Most Katy homes have orange peel or knockdown texture applied with a hopper gun and air compressor. For small patches, a can of spray texture (available at hardware stores) can approximate the pattern after practice on cardboard. Exact matching requires feathering the texture 12–18 inches beyond the repair edge and overlapping into existing texture before it dries.
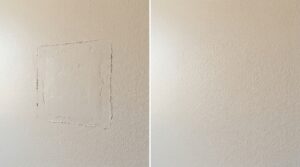
You can fill and sand a patch perfectly and still have a visible repair if the texture doesn’t match. Orange peel and knockdown textures, the two most common in Katy construction, require different techniques.
Orange Peel Texture
- Use a can of spray orange peel texture (Homax or equivalent).
- Practice on cardboard first — distance from the wall and pressure both affect bead size.
- Prime the patch before texturing. Unprimed compound absorbs texture spray differently from surrounding primed wall.
- Apply in a sweeping motion, overlapping 8–10 inches beyond the patch edge into the existing texture to blend the transition.
- Allow to dry 30–60 minutes before painting.
Knockdown Texture
- Apply thinned joint compound with a thick-nap roller, then knock down the high points with a wide drywall knife held at a shallow angle.
- Timing matters: knockdown texture only 3–5 minutes after rolling, when the surface has started to set but is still soft. Too soon and it smears; too late and it tears.
- Blend by feathering 12–18 inches beyond the repair.

Frequently Asked Questions
How do I fix drywall in a Katy home that keeps cracking in the same spot?
Recurring cracks in the same location, especially diagonal cracks from window or door corners, usually indicate ongoing foundation movement from Katy’s expansive clay soils. Patch the crack using fiberglass mesh tape (more flexible than paper tape) and setting compound, but monitor it after the next significant rainfall event. If the crack re-opens within 6 months, have a structural engineer or foundation specialist evaluate the underlying soil movement before investing further in drywall repair.
Can I use spackle instead of joint compound for drywall repair?
Spackle is appropriate for nail holes and very small damage under 1/2 inch. For anything larger, use joint compound. Spackle shrinks significantly as it dries, has poor adhesion to paper tape, and is too brittle for repairs that span a seam or require feathering over a wide area. Setting-type joint compound (Durabond or Easy Sand) is superior for structural repairs; lightweight pre-mixed compound is better for finish coats.
How long does drywall repair take to dry before painting?
Setting-type compound (Durabond, Easy Sand) cures chemically in 45–90 minutes per coat. You can apply the next coat without waiting overnight. Pre-mixed compound requires 24 hours per coat in normal conditions; in Katy’s high summer humidity, allow 36–48 hours. Never paint over compound that isn’t fully white throughout — any gray or darker areas indicate residual moisture. Prime first, then paint only when primer is fully dry (minimum 1–2 hours).
How do I know if my drywall damage is from water or just age?
Water-damaged drywall typically shows a ring stain (brown outline with a lighter interior), bubbling or peeling paint, a soft or spongy surface when pressed, and sometimes a musty smell. Age-related damage presents as hairline cracks along seams, nail pops, or tape separation without discoloration. If you see staining, confirm the moisture source is resolved before patching — and probe the surrounding area for soft spots that may indicate broader damage behind the surface.
What type of drywall should I use for repairs in bathrooms or high-humidity areas?
Use moisture-resistant drywall (commonly called “green board” or, for tile-adjacent areas, cement board / HardieBacker). Standard gypsum drywall will absorb moisture over time in bathrooms and laundry rooms, leading to surface breakdown and mold growth behind wall finishes. In Katy homes, where ambient humidity is already high, using standard drywall in wet areas accelerates this timeline significantly.
How much does drywall repair cost in Katy, TX?
DIY drywall repair costs $15–$65 depending on the size of the repair and whether you already own basic tools. Professional repair in the Katy/Houston metro typically costs $150–$400 for small-to-medium patches, with texture matching adding $50–$150. Water damage remediation that requires cutting out and replacing larger drywall sections runs $300–$800 or more depending on scope. For most homeowners, small and medium repairs are well within DIY capability with the right materials and technique.
Is it better to repair or replace drywall after a flood?
Replace it. The FEMA guidelines for flood-damaged building materials recommend removing all drywall that was submerged or saturated, since gypsum board acts as a substrate for mold growth even after apparent drying. Cutting out flood-damaged drywall also allows inspection and drying of the structural framing and insulation behind it, which are at equal risk. Patching over flood-damaged drywall that was not fully remediated is among the most common causes of post-flood mold recurrence in Houston-area homes.
Can I paint directly over a drywall patch without sanding?
No. Unsanded compound has surface roughness that will be visible under any paint sheen and pronounced under flat paint at raking light. More critically, the knife ridges and feather edges of an unsanded patch are mechanically weak — paint applied over them will peel at those edges. Sand with 120-grit to shape, then 220-grit for final smoothing before priming. The sanding step takes 5–10 minutes on a small patch and is the difference between a professional-looking repair and a visible one.
Sources & Citations
-
Angi. (2026). What does it cost to install drywall in Houston, TX? Angi. https://www.angi.com/articles/what-cost-install-drywall/tx/houston
-
Hippo. (2024, September 11). The hidden cost of DIY: 58% of homeowners blow their budget. Hippo Insurance Services. https://www.hippo.com/blog/hippo-DIY-projects-and-costly-mistakes
-
Homeyou. (2026). Houston drywall repair costs. Homeyou. https://www.homeyou.com/tx/drywall-repair-houston-costs
-
National Oceanic and Atmospheric Administration. (2026). National Oceanic and Atmospheric Administration home page. U.S. Department of Commerce. https://www.noaa.gov/
-
Texas Department of Licensing and Regulation. (2018, October 16). Foundations on expansive soils – residential (Technical Bulletin IHB TB 10-01). Texas Department of Licensing and Regulation. https://www.tdlr.texas.gov/ihb/pdf/TB1001.pdf
-
U.S. Environmental Protection Agency. (2026). Mold. U.S. Environmental Protection Agency. https://www.epa.gov/mold